BQE CORE Update, January 2021: 6 New Features You Don't Want to Miss
This month marks our 23rd update in 3.5 years, and is truly one of the most remarkable to date.
BQE CORE delivers frequent, regular feature updates based on customer requests, and our quarterly webinar updates help improve your use of the platform.
As you all should know, BQE Software has an aggressive development process, which is partially fueled by the feature requests we receive from our continually growing customer base. I do a quarterly update webinar where I spend about 45 minutes sharing with our users what I consider to be the most valuable changes along with new features and modules that will bring value to your firm and improve your use of the platform. This webinar isn’t a deep dive into any of the new features. Instead, it’s intended to expose you to new implementations so, when you see the value they bring to your firm, you can explore them on your own and enhance your experience with Core.
I encourage you to attend the webinars live, but you are also welcome to catch up on my updates as well as other webinars produced by BQE University by visiting our events page. All of our content is intended to help your firm be more productive whether we’re offering product information or amazing presentations from thought leaders in a variety of industries.During the April presentation, I covered 26 new features in our Core WebApp and an additional 13 new features included with Core Mobile. If you want to know about all the changes made during each monthly sprint, I encourage you to read our change log. You can access it directly from the Core Sign-In screen.
In this blog installment, I’ll cover only the ten most significant features you need to know.
This feature fixes a problem many users reported where they would apply a set of filters to a list of records, but the only way to know what filters were being applied was to go back to the Filter detail pane. This is no longer necessary with the implementation of Filter Chips.

Filter Chips are the (1) small blue boxes directly above the list. The width of the chip is fixed, so if there are more items selected within the category, it will indicate there are more. Simply clicking on the filter chip will (2) expand it to display all the filtered items.
One of the fundamental benefits of Core are its time and billing features. Hopefully, you are all using Core to do your billing.
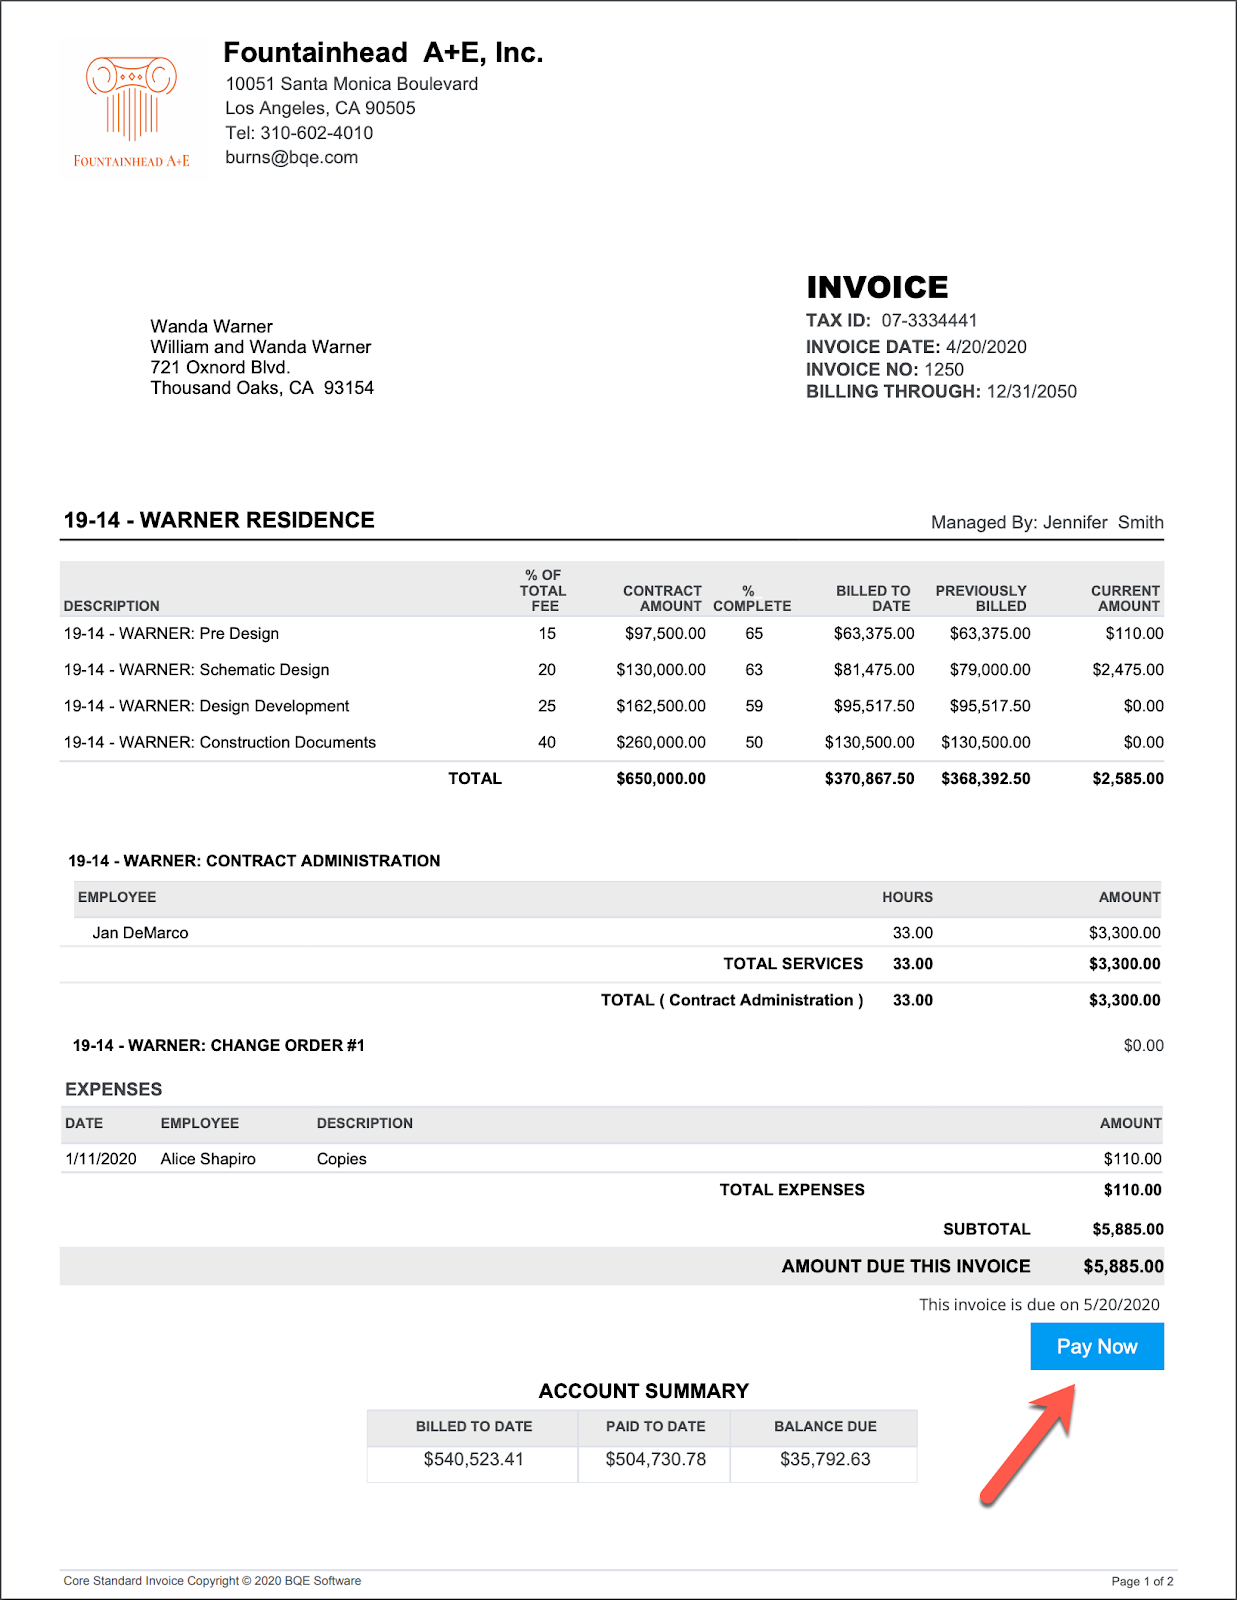
We introduced ePayments a number of months back. This gives your firm the ability to send an electronic invoice to your client. Then, your client can click the Pay Now button and pay electronically, instantly.
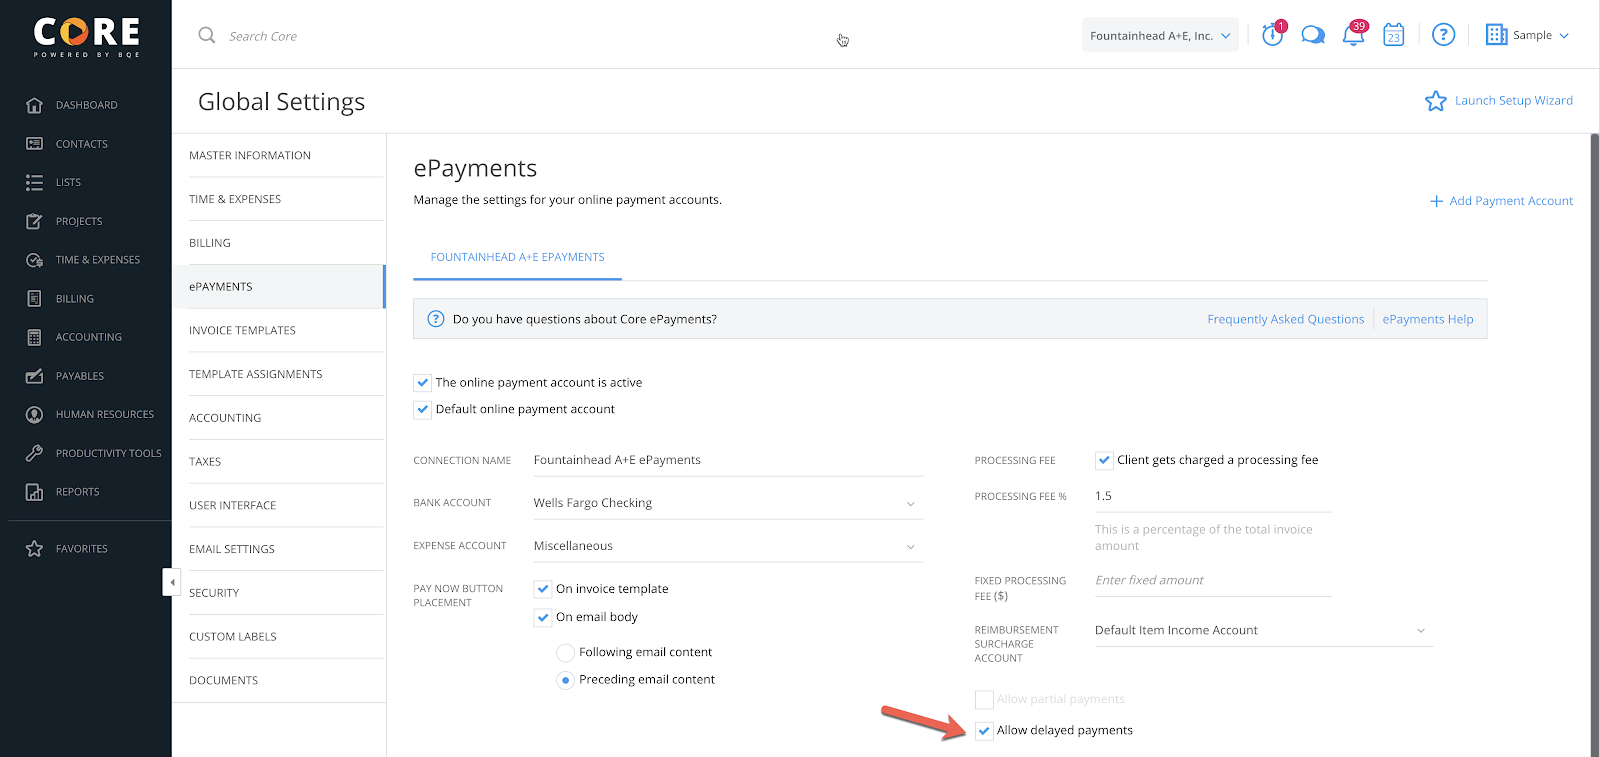
The feedback we received from our customers is that while having Core email the invoices to your clients instantly, upon finalization, was helpful, it wasn’t enough. If your firm typically has terms like 15 or 30 days, and your clients didn’t want to pay your invoice the moment they reviewed them, you needed a way to allow for payment options. Our solution, introduced this month, is enabling scheduled payments.
To enable this feature, you need to go to Global Settings > ePayments and turn it on.
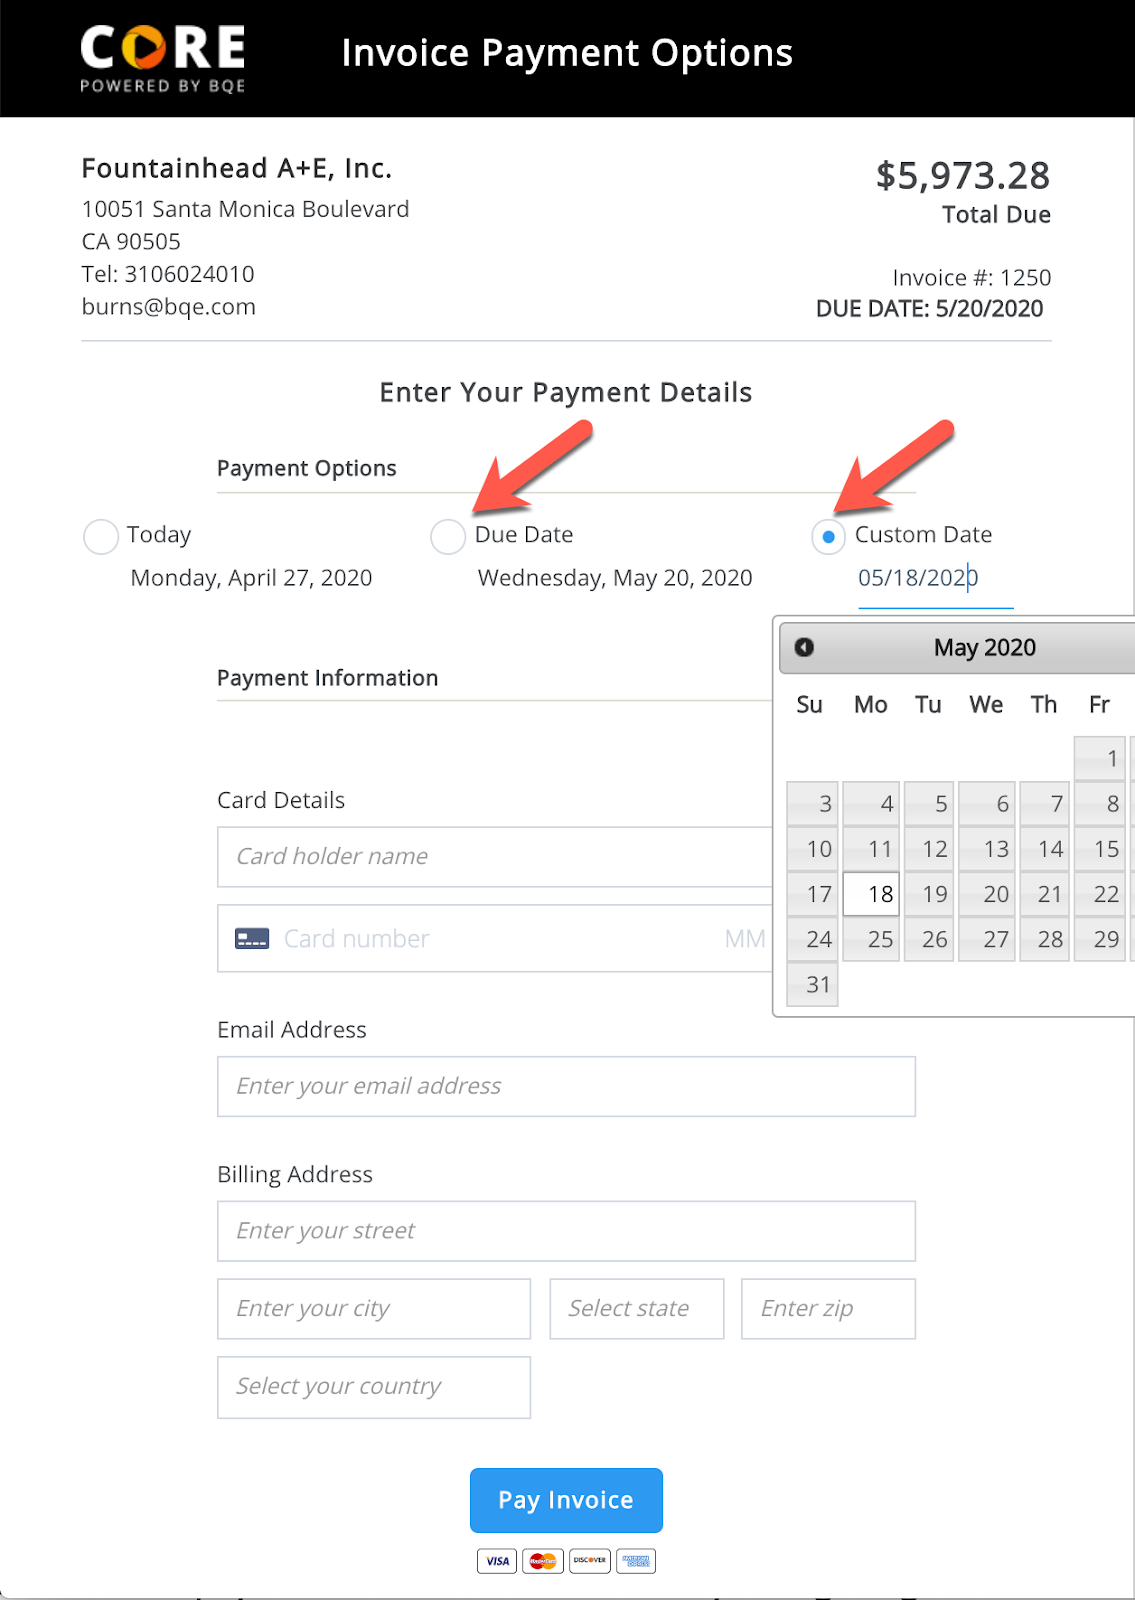
As you can see, when a client receives your invoice, the Pay Now button will take them to the payment portal where they can select to pay now, pay on the due date, or select any date between now and the due-date.
On a related note, currently, these payments are via credit cards. Many of you have been asking for alternative payment methods. Our R+D team is planning to have ACH payments ready by our July 2020 sprint.
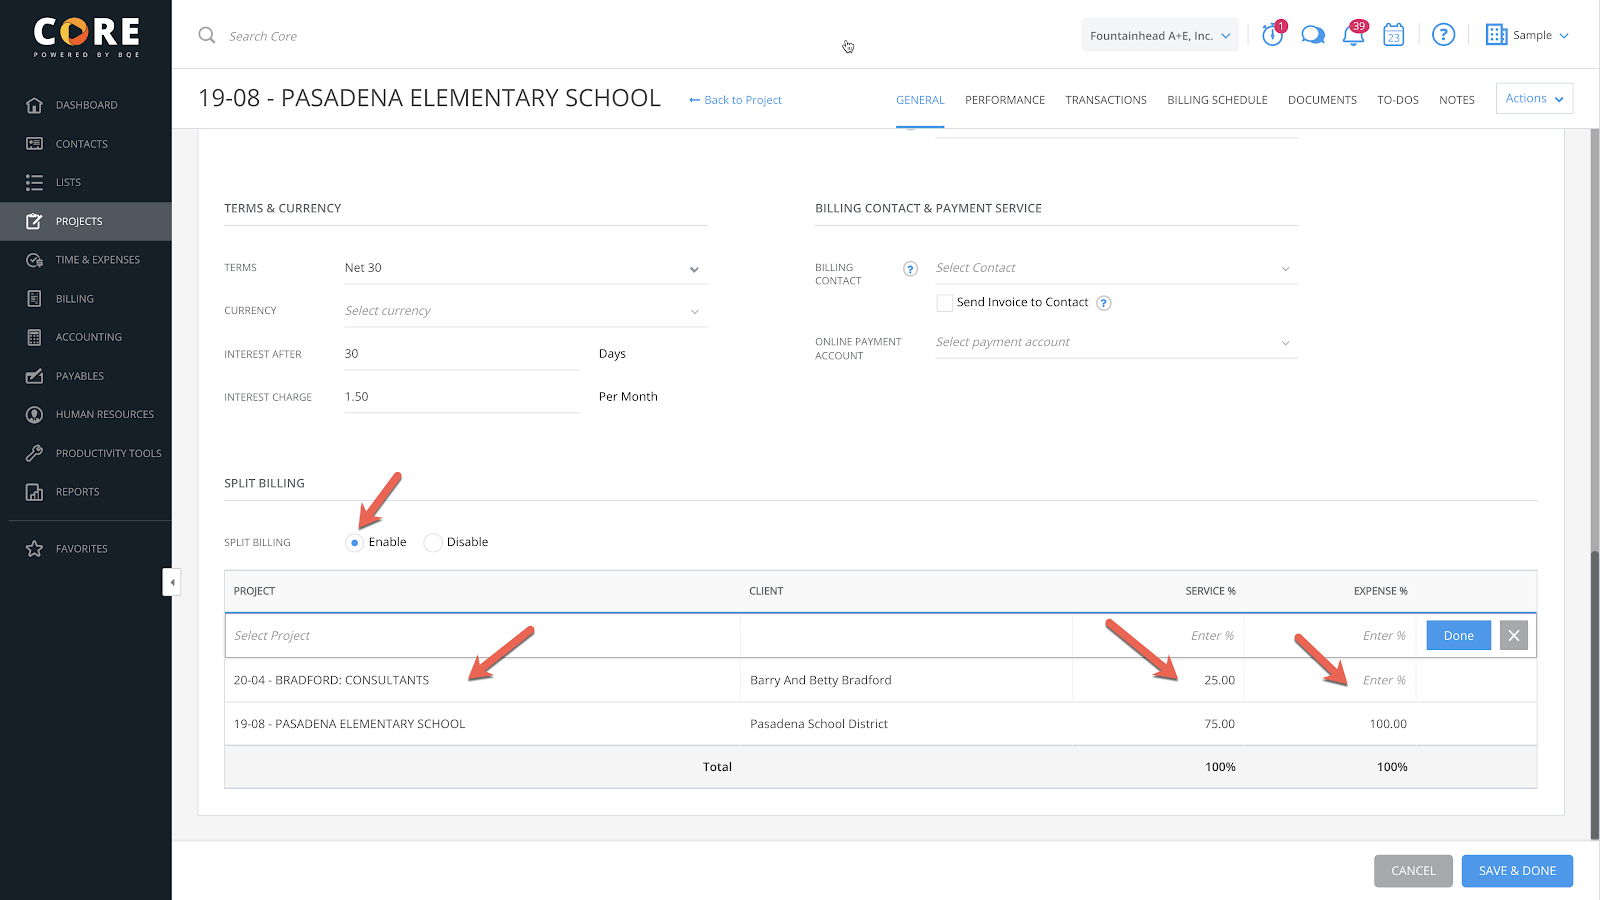
Split billing is an interesting feature that is often used by the legal industry. This is used when there is a matter (project) where you need to have the invoice shared by multiple clients. Perhaps you're an architect doing tenant improvement work where a portion of the fees are to be paid by the tenant and the rest by the building owner. Split billing makes this much easier than breaking the project into two sections and expecting your employees to track their time and expenses properly to each individual project. Simply create one project for all time and expenses, then enable split billing.
You can find the feature on the Project > General > Billing Options screen. Navigate to the bottom and you’ll see the new feature.
By default, 100% of the services and expenses go to the main project. But when you turn on split billing, you can allocate a percentage of the services and expenses to be allocated to another project (or client). Two invoices will be generated, both with the same invoice number, but sent to two different clients. When payments are received, they will automatically be applied to the same invoice.
When your firm uses Core’s Resource Allocation feature, you receive many benefits. Managers can allocate their staff to work on certain projects, on certain dates, doing certain activities. Then, Core will auto-notify the individuals about the manager's expectations. Using the allocation feature also means your firm can forecast staff utilization as well as estimate future revenue based on what everyone is working on.
The new Task Allocation widget is the fourth associated with this feature.
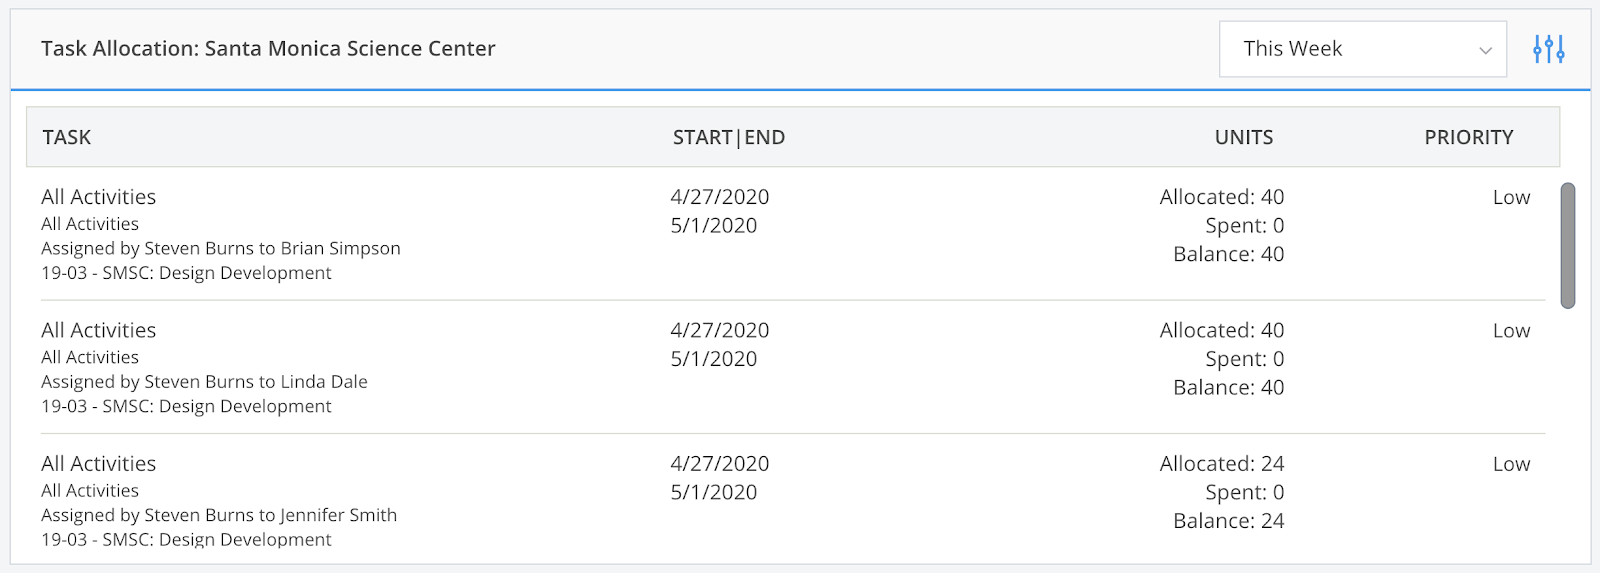
In the example shown here, I’ve filtered the widget to tasks associated with the Santa Monica Science Center, which are occurring this week. The widget provides detailed information as to the Activity:
Finally, it shows the priority rating for the task so the staff knows which items are most important to accomplish.
We now have the ability to set bill and cost rates based on classification. In order to enable this, you must turn on the Project rule first. Navigate to Project > General > Assignment to add the new rule.
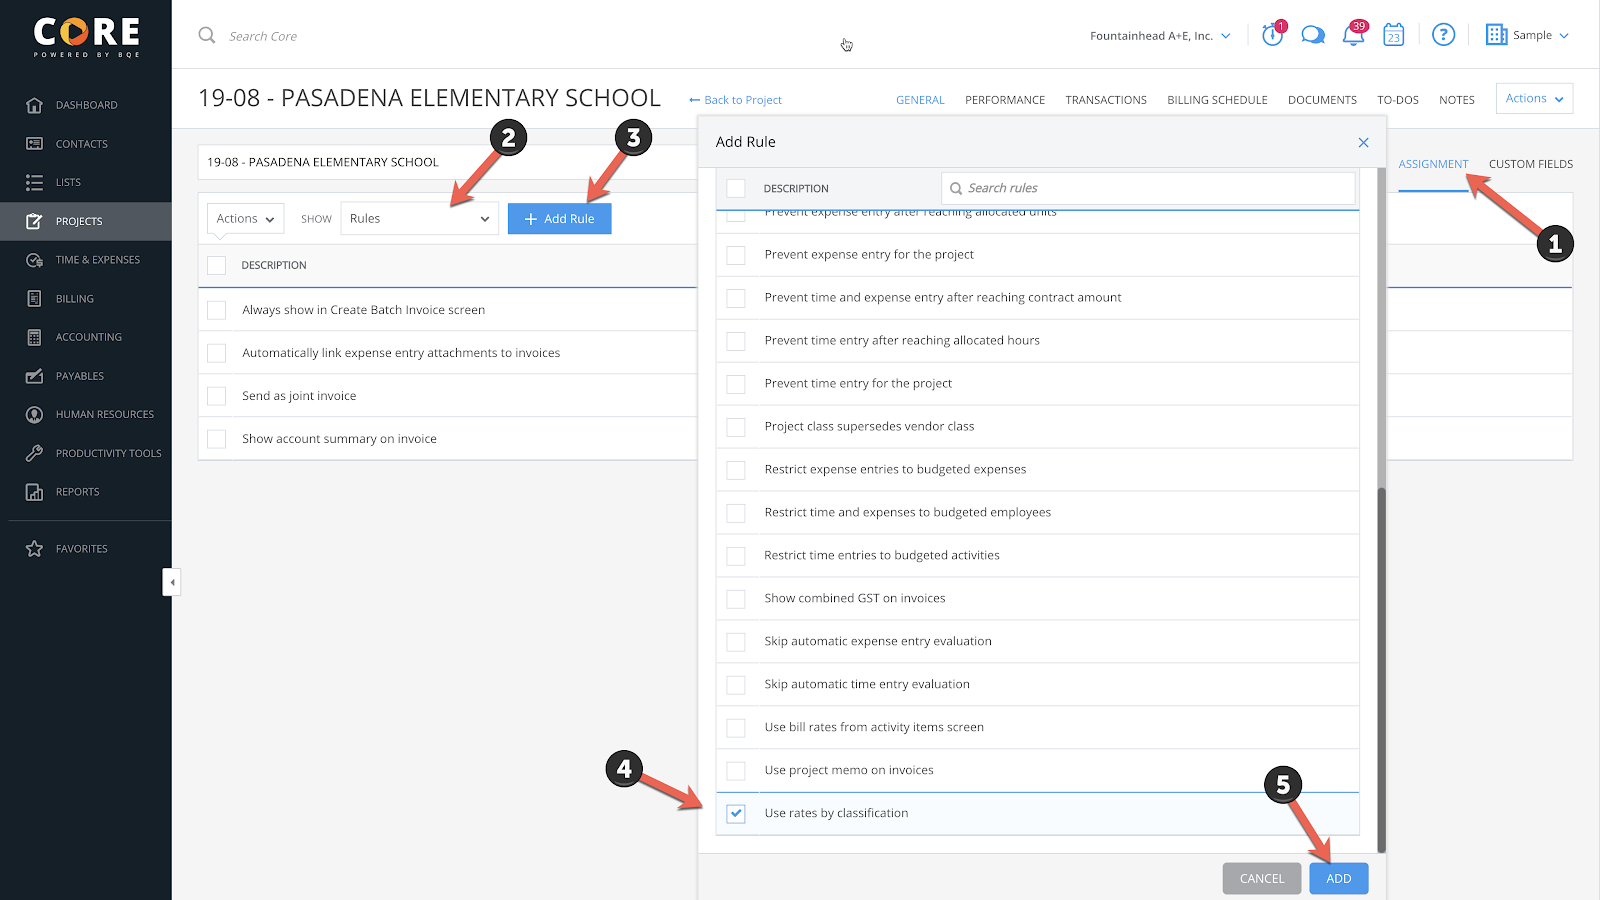
Next, you’ll want to set the rates in the Project Fee Schedule.

In this example, I have created two new entries at the top of the Fee Schedule. One is for any time record that uses the (1) classification of Draftsmen. When the Draftsmen classification is used, that record will bill at $100/hour. If the classification of Project Architect is used, the time will be billed out at $150/hour.
It’s important to remember to set the (2) Priority for the Fee Schedule line items. In this case, when the employee sets their classification on the time record, these two lines will override all other fee schedule lines that may apply to the record.
There has long been a need for firms to write-off a group of records on a project. For whatever reason, certain hours or expenses just can’t be billed. It used to be necessary to filter a list of records, select them, and then change their status as Billed. This was a very tedious process, especially if you had many projects over long periods of time.
We have just introduced the ability to use a wizard-style method that can take large groups of records and smartly find the correct projects and invoices for you to stitch them to. This is accessed from the Time and Expense Reviewer screen.
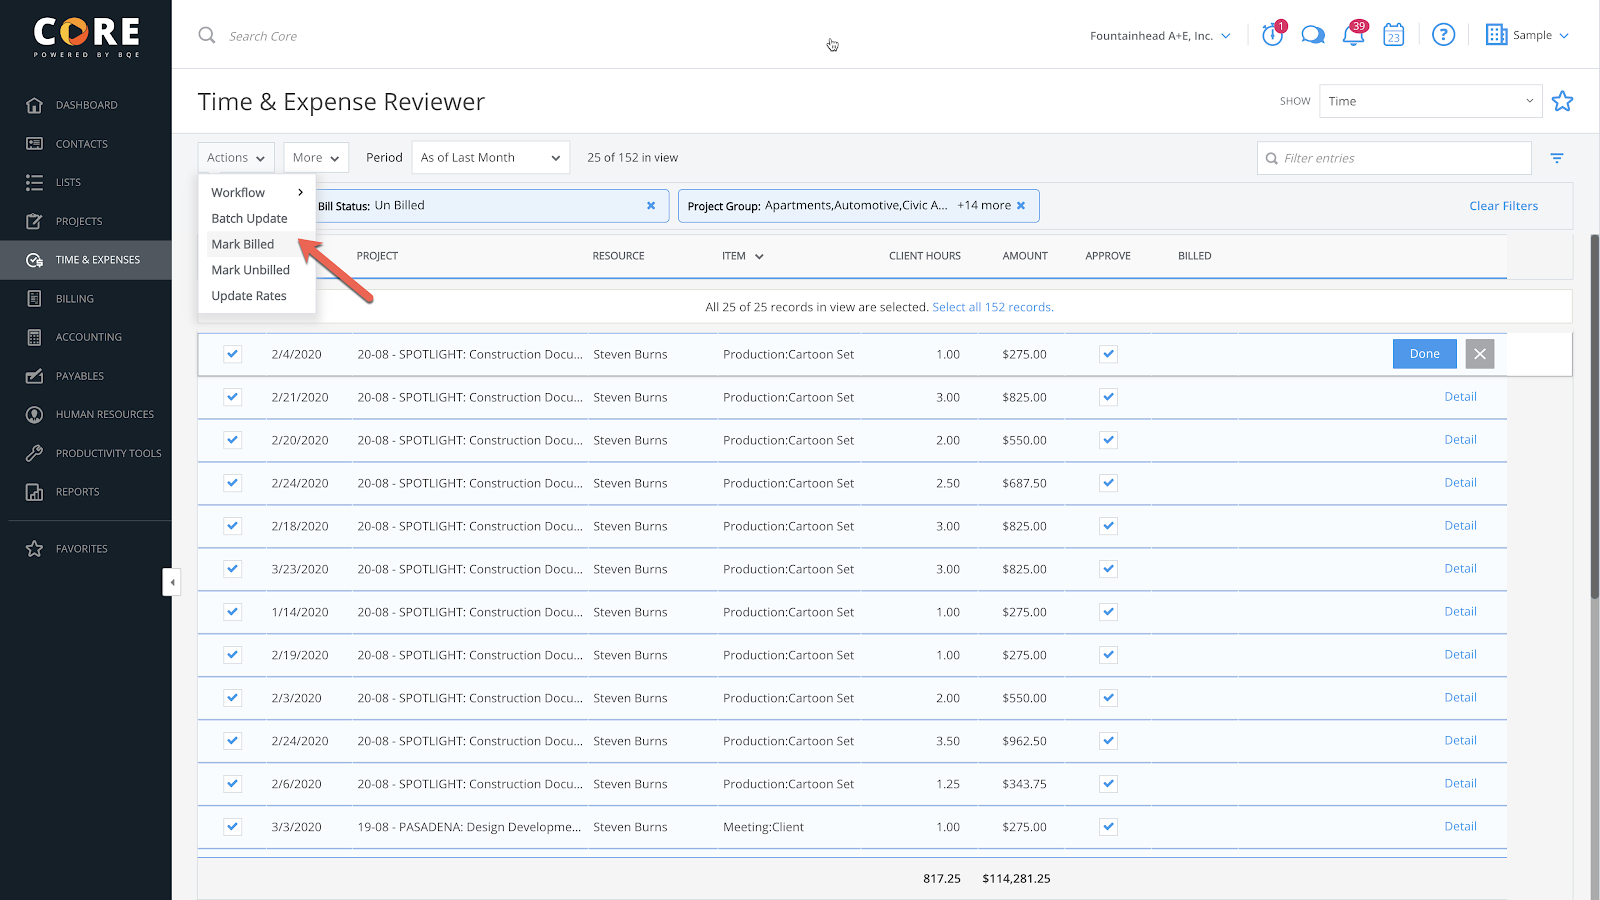
Use the filters to find all the records that apply and use the Actions dropdown to select Mark Billed.
This will pop up a window, which will offer the option to simply mark them as billed or assign them to an existing invoice.

This starts the wizard that groups all of the projects and phase records and asks you which invoice you want them to be assigned to. Within seconds, you can clear out all of the records that need to be written off for all projects.
When I use this feature, I typically like to stitch the records to the invoice generated during that billing period. For that reason, I would first want to filter the records to the particular month.
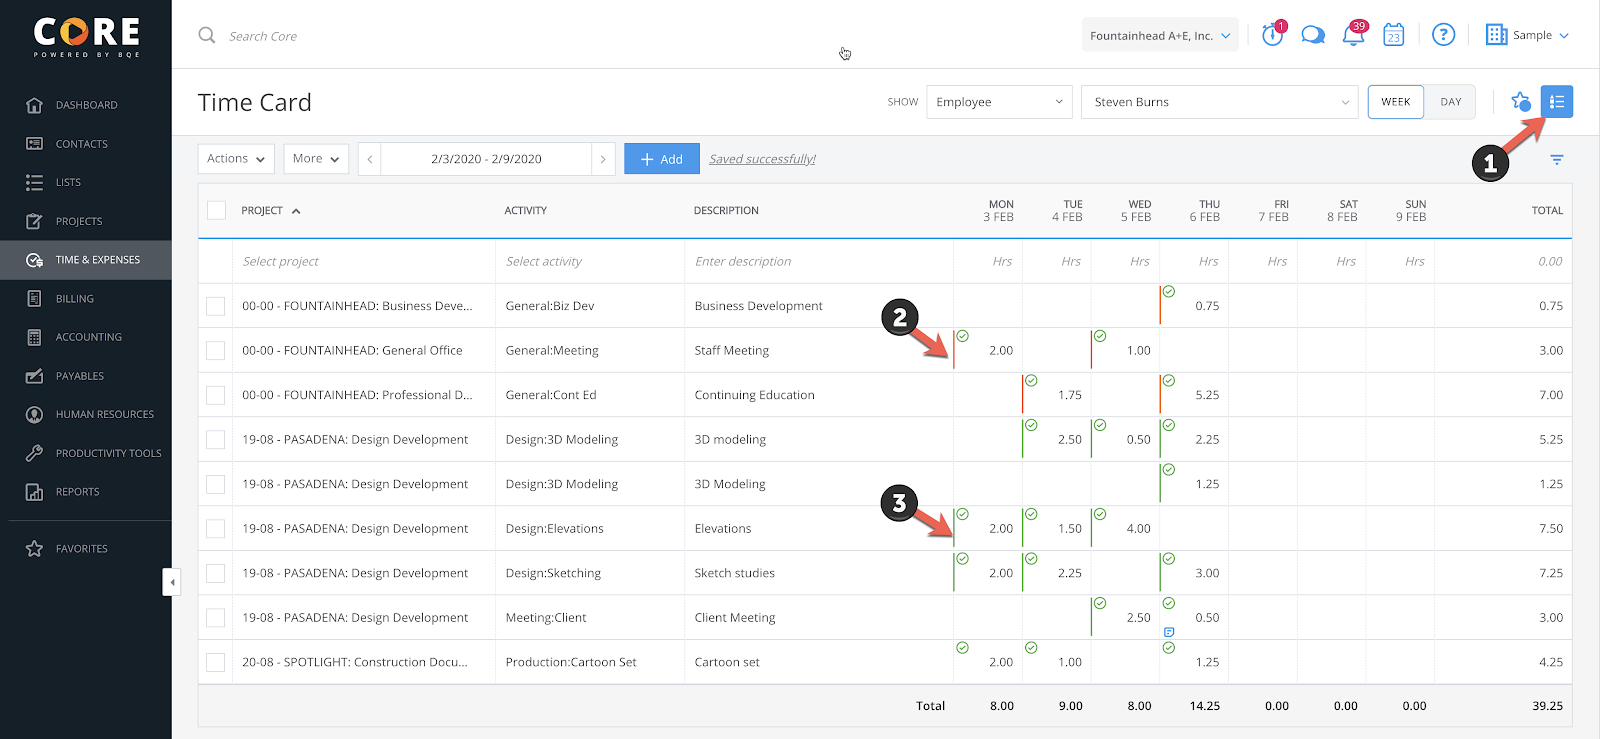
We have enhanced the Timecard feature to allow the use of filters. If you have a timecard that is commonly loaded with many projects and activities, but you know that this week you will only be working on very select items, you can filter the timecard and isolate only the items that make sense.
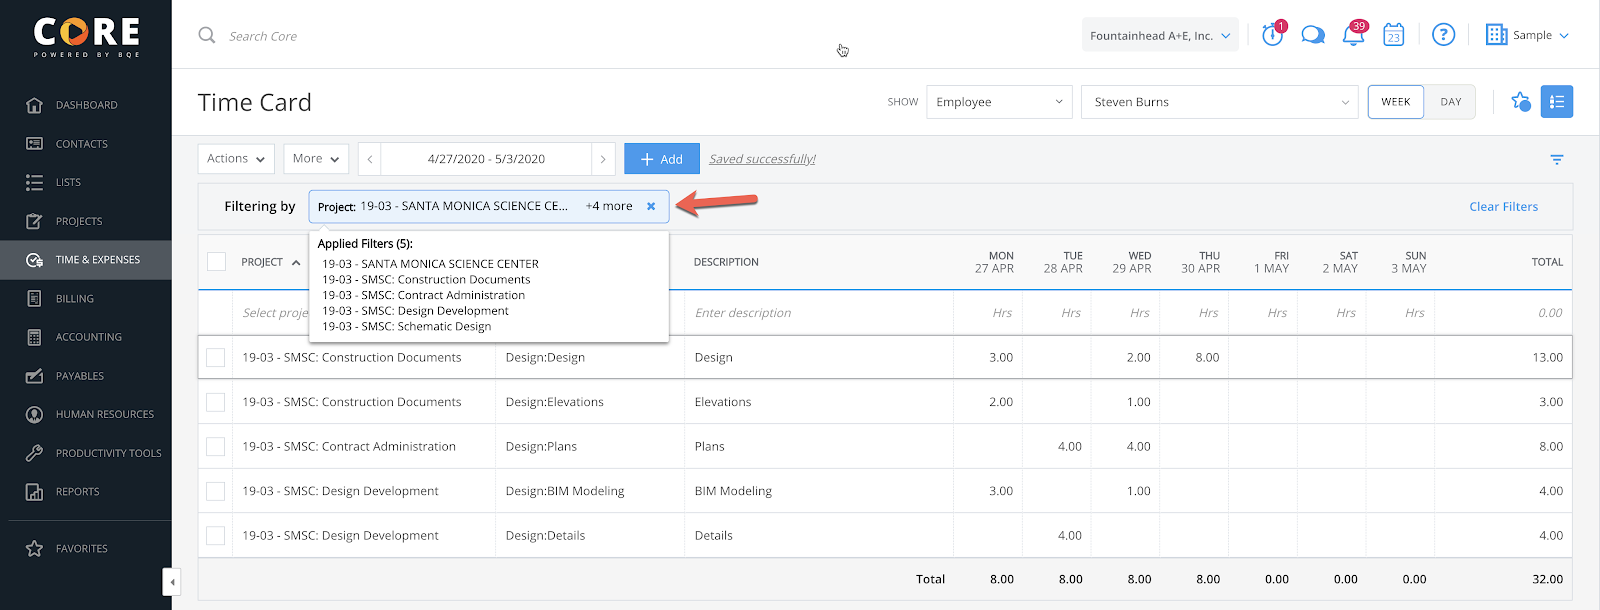
Please keep in mind that if it appears as if time is missing from your timecard, look and see if there are any filter chips applied and remove or edit them.
There’s also been an enhancement made to the Timecard Status tool. Now, when you display the status (1), you’ll notice a vertical line to the left of certain records. A vertical red line (2) indicates the time is non-billable. A vertical green line (3) means the record has been billed.
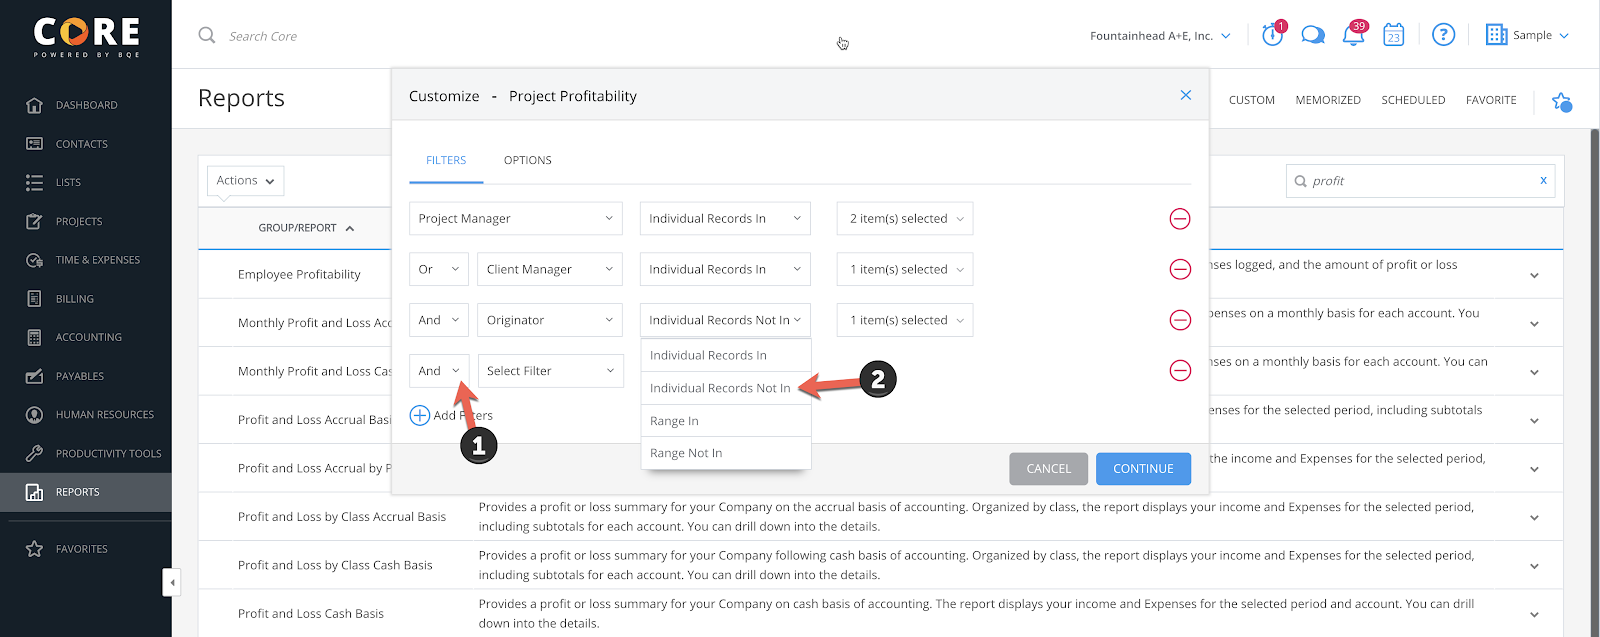
We have added the ability to expand the filtering of reports to include (1) IF, AND and (2) NOT. This finally gives you the ability to refine your filtering to precisely the recordset you want to include when there are multiple criteria.
In Core, we have project-level budgets that help track the expected revenue and cost of projects against the actual values. With our new Financial Budgets, you can also create company-wide or department-wide financial budgets for the current or upcoming fiscal year.
Financial budgets are high-level estimations and internal calculations useful for predicting and allocating the income and expenses of a business. They allow you to define cost and revenue benchmarks that can be used for running comparison reports and setting up budget-related notifications. As the year progresses, you can run a comparison report to see how the company’s finances are holding up against what you have budgeted.
Core pulls the profit or loss data of each account from the reference year and compares those actual values to the current budgeted values. This comparison helps create more accurate budgets for the future. Core tracks each account in the budget and informs you about the actual amount earned or spent, and whether the account is over-budget or under-budget.
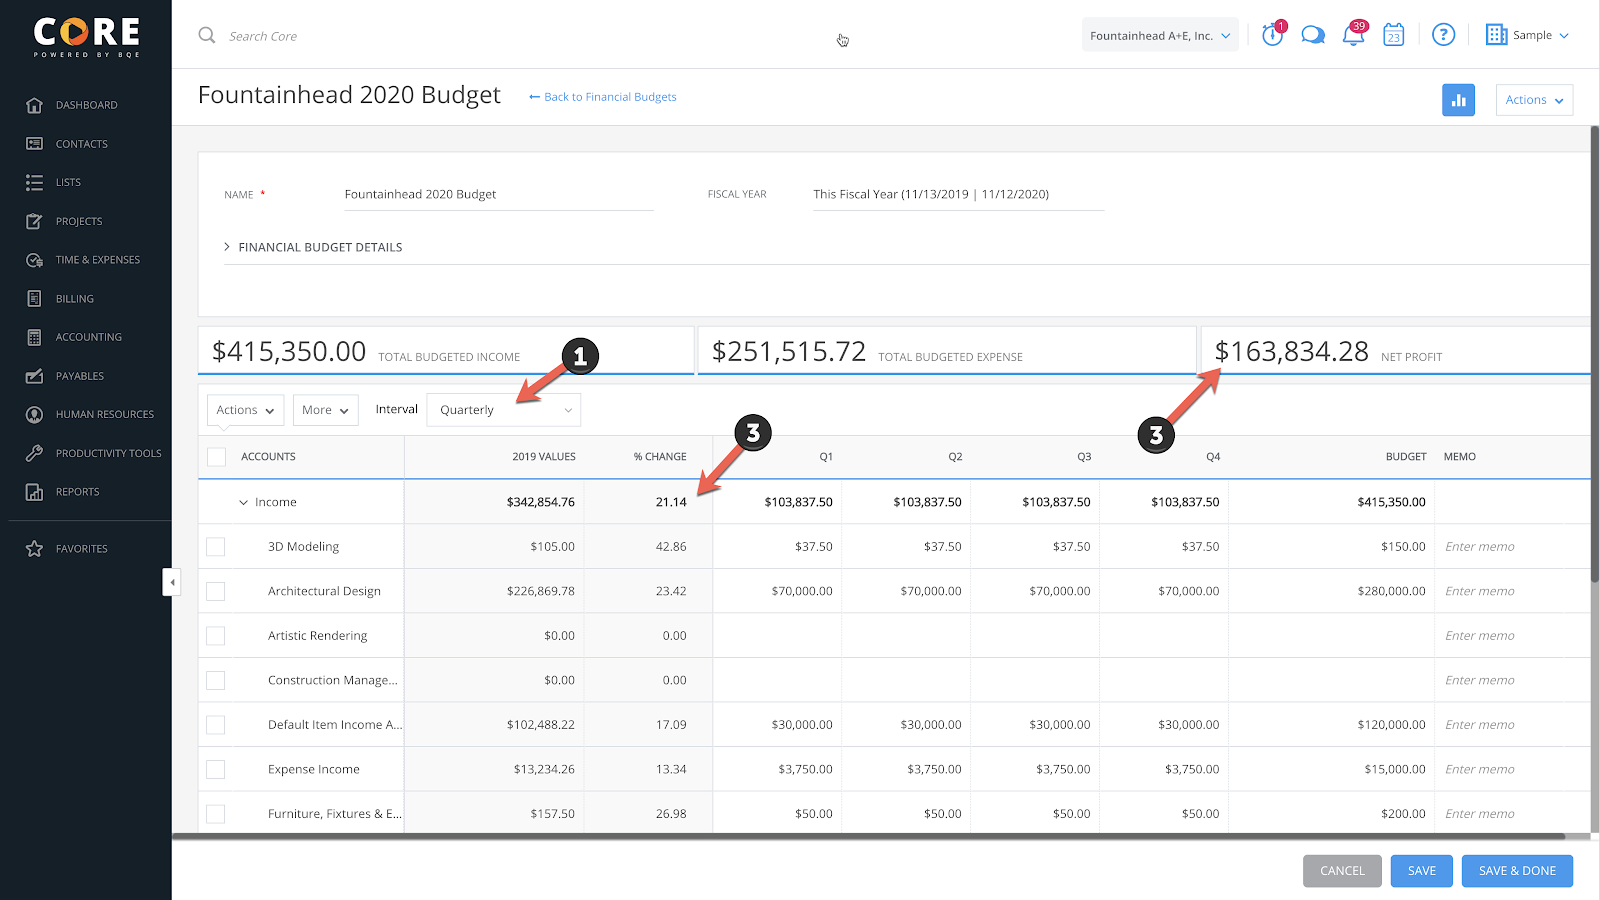
You can view and edit line items on an (1) annual, quarterly, or monthly basis. You can see the reference year’s totals and the (2) percentage change for the current budget. Another helpful feature is the ability to instantly see the (3) Net Profit that your firm is expecting based on the budget.
I really couldn’t stop with just ten new features. I’ll close with a feature that is hugely popular with the legal industry, but also has value for any professional service firm.
We have added Trust/IOLTA account management. This powerful enhancement will allow users to manage and report on a client’s funds separately from their firm’s operating bank accounts. It comes packed with reports and widgets that allow tracking trust funds by matter (project) and three-way account reconciliation that can be run for each statement period.
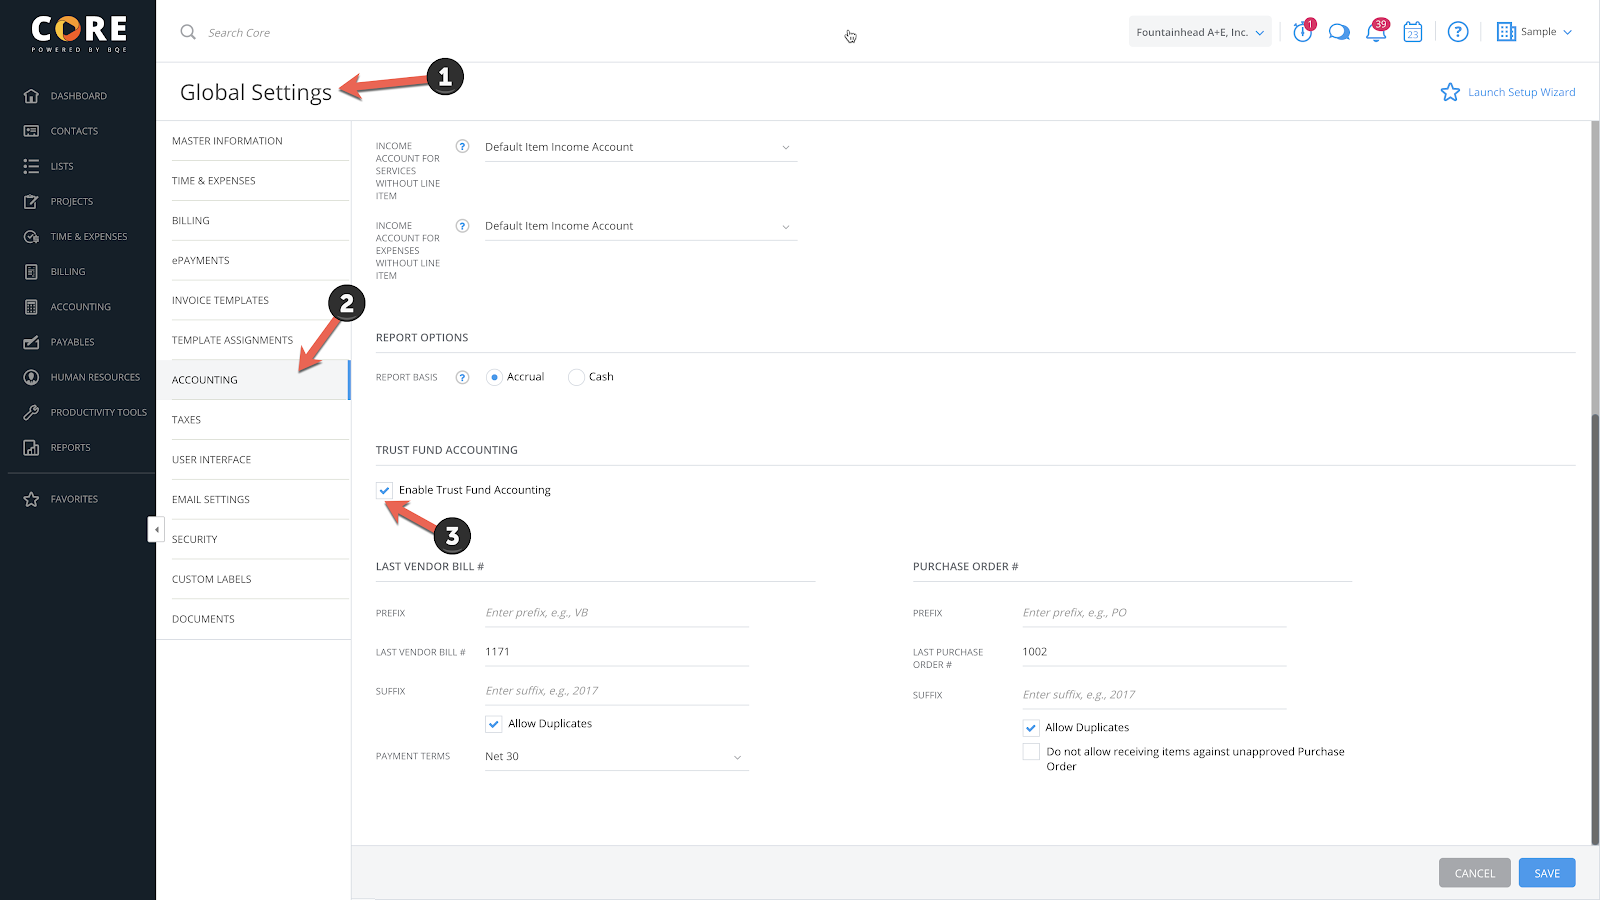
You need to enable this feature in (1) Global Settings by navigating to the (2) Accounting section where you can (3) enable Trust Fund accounting.
After this is done, you can go to your Matters (Projects) and navigate to the General > Billing Options screen where you will see the field to select as the Trust Fund Account.
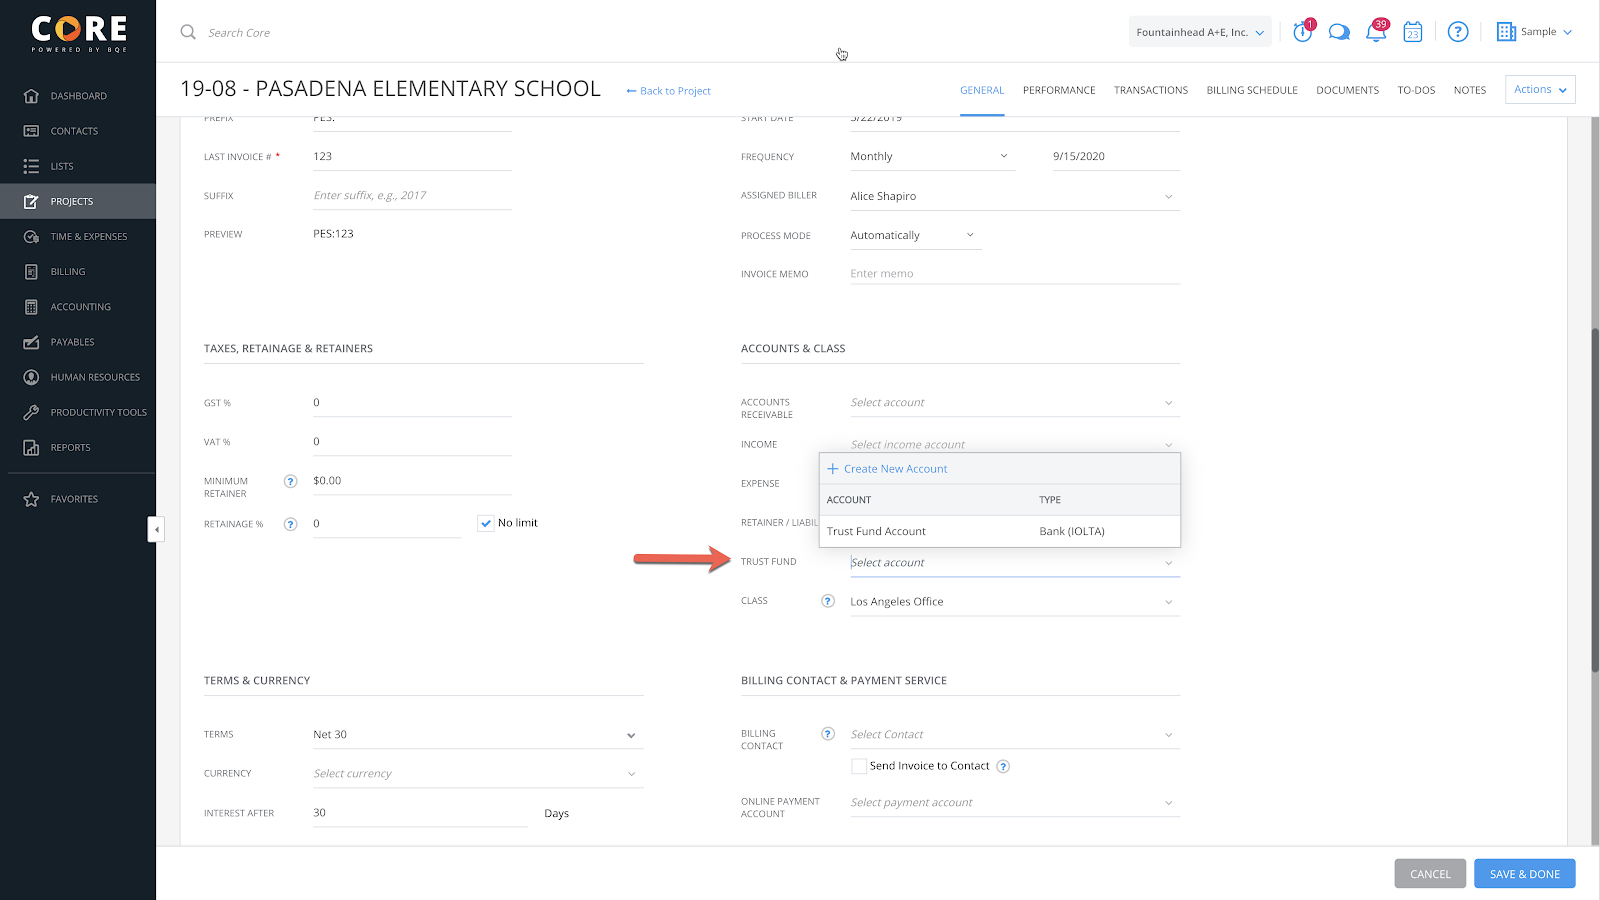
If your firm wants to look at financial reports, such as a Balance Sheet, and not confuse the client retainers as to what funds are available to your firm, this is the perfect feature.
There you have it. Don’t forget to regularly read the Change Log (accessible from the Core Sign-In screen) for more insight about new features. You will learn about our constantly improving platform and find new ways to become more efficient and productive.
Steven Burns, FAIA, is a renowned global thought leader, architect, and highly sought-after speaker on topics related to emerging technologies and effective firm management. As the founder of The Well-Designed Firm, a cutting-edge business consultancy, Steven is committed to helping A/E firms elevate their business practices to the same level of elegance as the architecture they create. With a Master of Architecture degree from the prestigious Harvard Graduate School of Design and over 7 years of experience at SOM, Steven is a true expert in his field. He also founded his own architecture firm, BBA Architects, which he successfully sold in 2007. Steven's contributions to the architecture industry go beyond his work as an architect and business consultant. He is also the mastermind behind ArchiOffice, a popular project and office management software that he developed and later sold to BQE Software in 2010.
This month marks our 23rd update in 3.5 years, and is truly one of the most remarkable to date.
Managing resources, updating your financial reports and staying on top of everything needed when accounting for projects shouldn’t be difficult.
A Bombshell Dropped by the AIA Survey on Technology: I recently got my hands on an advance copy of a new survey coming from the American Institute of...
Be the first to know the latest insights from experts in your industry to help you master project management and deliver projects that yield delighted clients and predictable profits.