Progress billing is an incredibly convenient billing method, yet this functionality is oddly missing from most common invoicing software solutions. Progress billing itself simply refers to the practice of billing a client at different stages of a project or a job. It has different applications that are helpful not just for your business, but also for your clients.
Progress Billing for Fixed Fee Projects: If you operate based on fixed fees for your projects, progress billing is a lifesaver. Instead of trying to convince a client to pay for everything up-front, or waiting until you finish a project to get paid, it lets you bill portions of the contract amount and receive payments as you continue working on the project. It’s a happy compromise. Both you and your clients are happier and find the work to be more financially stable, and your cash flow stays healthy.
The amount you bill can be determined by the percentage of the project that’s been completed, or they could be fees based on value billing.
Progress Billing for Late Time and Expenses: If you bill clients based on time and expenses, progress billing also has a purpose. It’s a straightforward solution for keeping your invoicing, payments, and cash flow on schedule and allows you to bill your clients as required even if your team’s time and expenses aren’t yet entered and/or approved.
If, for example, a key manager is out sick and records can’t be approved, you can bill your clients as required and then assign time and expenses after the fact. Furthermore, with progress billing, your clients won’t be thrown off by late invoices asking for unexpectedly large amounts. Your reputation will remain impeccable, and they’ll always know what to expect.
In BQE CORE, there are several ways to progress bill. If you want to create a percentage complete invoice, look at the section below. If you’re not worried about the percentage and just want to bill your client without your time and expenses being ready, look ahead to the “Progress Billing for Late Entries” section.
How to Bill Based on Percentage Complete: You can create single invoices based on percentage complete or generate a batch, just as long as your project doesn’t have a billing schedule or a recurring contract type.
-
Open the Invoices screen from the main menu > Billing > Invoices.
-
Click Create New and select Batch Invoice.
-
On the Invoice Filters and Options dialog, set your Filter By option to view the relevant billing records.
-
Select Other Options and click Continue.
-
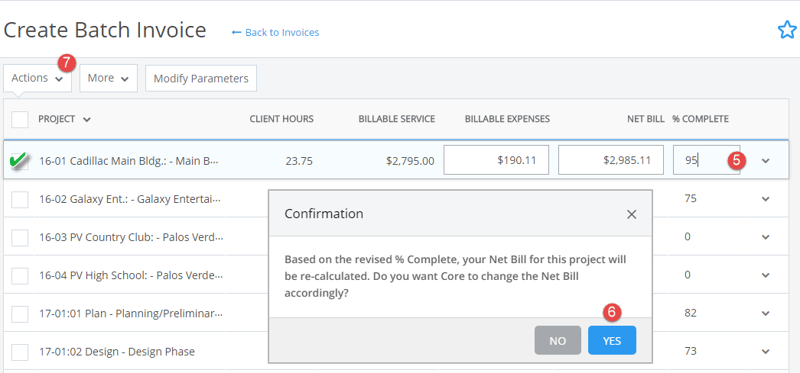
On the Create Batch Invoice screen, select a billing record and enter a value in its % Complete field. This will calculate the net bill based on the project’s percentage of completion (show this column using More > Columns).
-
CORE prompts you to revise the net bill and then carry the new percent complete value to the Projects screen. You can click Yes to both.
-
Select the billing record and click Actions > Process as Final. The record disappears here and appears as an invoice in the Invoices list view.
How to Progress Bill for Late Entries: CORE also lets you progress bill by adjusting the difference in the value of your time entries and generating a write up/down. It will automatically mark up your expenses, too. Later, you can associate the time and expenses to the relevant invoices (which have already been processed) through a batch update. After you process your invoice, this is how to match it with your time and expenses
-
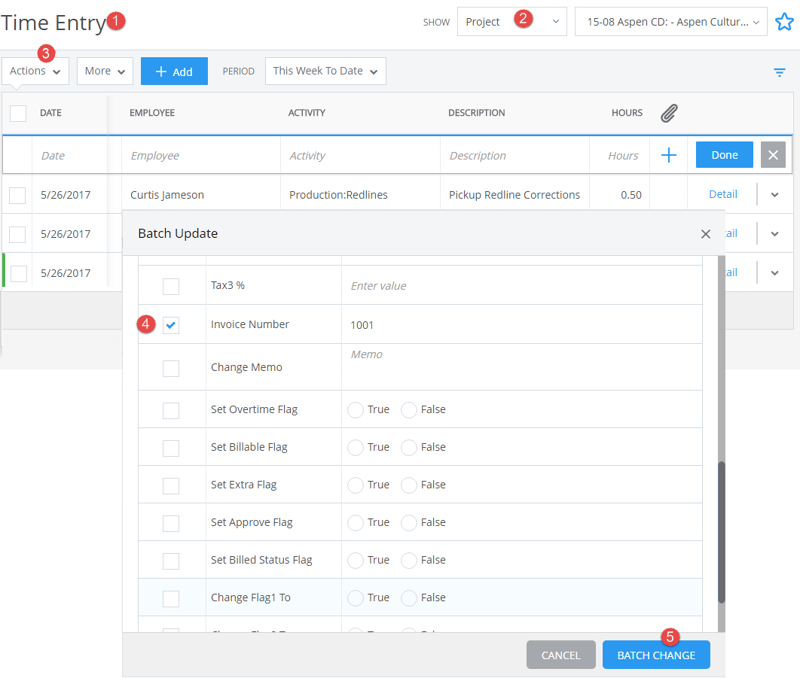
Go to the Time Entries screen from the main menu > Time & Expenses.
-
Select Show: Projects and then choose the relevant project from the drop-down.
-
Next, select the time entries on the grid that need to be associated with the invoice and click Actions > Batch Update.
-
On the Batch Update dialog, select the invoice number to be associated with the time entries.
-
Click Batch Change.
The process for releasing expense entries is essentially the same.
-
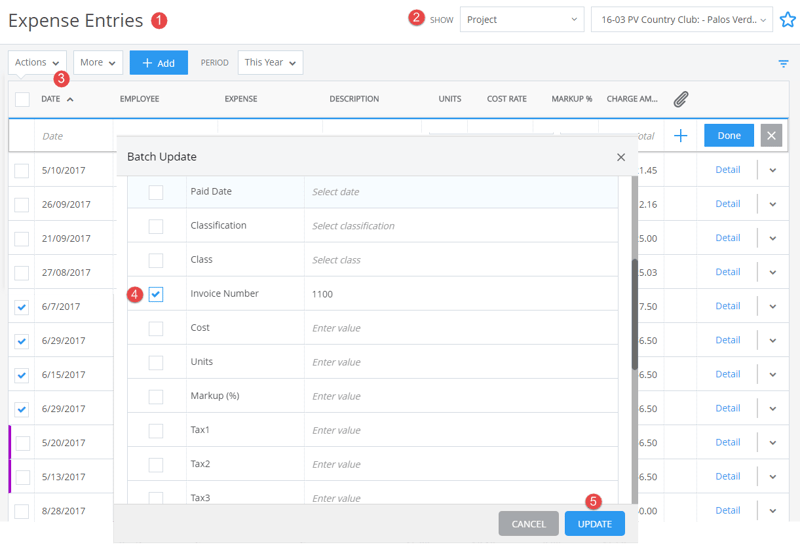
Open the Expense Entries screen from the main menu > Time & Expenses.
-
Click Show: Projects and select the relevant project from the drop-down.
-
Now select the expense entries on the grid that need to be associated with an invoice and click Actions > Batch Update.
-
On the Batch Update dialog, pick the invoice number to be associated with the expense entries. CORE automatically handles any mark-up/down on the entries.
-
Click Update.
And just like that, your invoice is updated. Moreover, if you need to reprint the invoice, the items you added will be there. With progress billing being so simple, there’s no reason why you shouldn’t take advantage of it to keep your cash flow healthy.
Track, Forecast, and Plan with Our Revenue Projection Template
To help architecture and engineering firms improve cash flow visibility and plan more effectively, we’ve created a free, editable Revenue Projection Template. This easy-to-use spreadsheet helps you track project revenue, forecast future earnings, and identify when income may fall below monthly targets—so you can spot gaps, plan ahead, and keep your firm on track toward profitability.